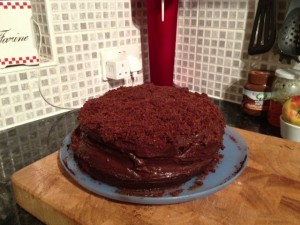
 If you’ve read this blog before, you’ve likely noticed that cookery, and more specifically cake, is a running theme. This is, at least in part, due to the fact that I have a tendency to try and bake my way out of tight corners. At the moment I’ve reached the stage in a rewrite where it is consuming most available time and headspace, and somehow the overflow for this also tends to spill out as yet more baking.
The cake you see here is the result of my trying to think-between-the-lines of an imaginary first date of sorts for two characters in Paris. A cake with Brooklyn in the name might not, therefore, seem the obvious first choice. Until you taste it, and all is revealed. Intense, sweet, creamy, and profoundly chocolatey, a bite of this little number is as close to the heady rush of a first kiss you are ever going to find in cake form.
What you see here is my second attempt. The first was sometime last year but, like most cakes around here, it disappeared before it could be documented. In addition to its near X-rated nature, this recipe also has several practical things to recommend it.
1. It can be prepared in stages. I’ve made the sinfully rich chocolate custard the day before, and then carried on with the cake. I am sure you could prepare it even two or three days before you wanted to serve it. If anything, the flavours just intensify, lifting this from first kiss to full-blown snog. (Besides, since you’re probably meant to be writing anyway, the less time you spend in the kitchen the better.)
2. The fat content can, theoretically, be reduced. Strictly speaking the custard doesn’t need all of that butter. It tastes just glorious even without it. Yes, the butter does help with structural support, but if your fridge is cold enough it’ll all be fine. It also is what gives the chocolate custard that candlelit erotic gleam. But, if you’re at all like us, you are probably going to be eating it late at night while concentrating on Newsnight or some Scandinavian crime thing, so the candlelit sheen can possibly wait for another pud.
I first saw this in a Waitrose magazine, in which they mention there is also a book. To be frank, I’m afraid to buy it, because I just know it will be fab, and there is a limit to how many baking books it is safe to keep in one house. Meanwhile, here’s the recipe.
Trust me. If you like chocolate and/or snogging, this is the cake for you.
Recipe: Brooklyn blackout cake
By Annie Bell
1. Have ready 2 x 20cm loose-bottom cake tins at least 5cm deep.
2. First make the filling, as this requires a cooling time. Blend the cornflour with about a third of the milk until smooth. Bring the remaining milk to the boil in a small nonstick saucepan with the sugar, syrup and cocoa, whisking until smooth. Add the cornflour solution, bring to the boil, stirring constantly, until you have a rich, thick custard. Remove from the heat and add the vanilla extract and butter, stirring until it melts. Ideally the mixture should be silky smooth, but if not give it a quick whiz in a food processor. Pour into a large bowl, cover the surface with clingfilm and set aside to cool completely.
3. Preheat the oven to 190C/170C fan/gas 5 and butter the cake tins.
4. For the cake mixture, cream the butter and sugar together in a food processor, then incorporate the eggs one at a time, followed by the vanilla extract, scraping down the sides of the bowl as necessary. Sift together the dry ingredients and add them half at a time to the creamed mixture, then add the milk with the motor running.
5. Divide the mixture evenly between the cake tins, weighing them for accuracy and smoothing the surface. Bake for 30-40 minutes until a skewer inserted at the centre comes out clean. Run a knife around each cake and leave to cool.
6. Remove the collars from the cakes and slit each one in half horizontally using a bread knife. Set aside the best-looking top half. Place the other top half in the food processor and whiz to crumbs.
7. To assemble the cake, first give the chocolate-custard filling a stir. Spread a quarter of the filling over one cake base, taking it almost to the rim, place the other base on top and spread with another quarter of the custard. Lay the reserved cake top in place. Coat the top and sides with the remaining custard.
8. Coat all over with the cake crumbs (this is the ‘blackout’). When coating the sides, imagine you’re making a sand castle: take handfuls of the crumbs and gently press them against the side, leaving any loose ones to fall down and discarding the excess. Chill for a couple of hours, then cover with clingfilm. Remove from the fridge 15-30 minutes before eating.
